St. Patrick's Kid Craft Ideas
Whether you are throwing a party at school or celebrating in your home, St. Patricks Day is a perfect holiday for getting the kids involved in crafts. This article contains several different St. Patricks Day craft ideas that are all easy to make. Some are great for small groups, while others are wonderful for an entire classroom. Each craft offers step by step instructions and pictures to help guide you.
Shamrock Name Tags
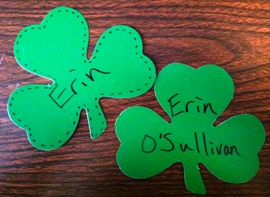
Before you start the major crafts, hand out green construction paper, scissors and markers to each kid. Tell them to draw their own shamrock on the construction paper, or provide them with a sturdy stencil for them to trace. After they cutout the shamrock, have them write their name in the center of the shamrock. An easy alternative to the kids cutting out shamrocks would be to use printed
Green Shamrock Cutouts that are five (5) inches in diameter. It can be their first name only, or allow the students to write both first and last. A fun twist would be to add O or Mc before their last name to make them sound Irish. They can add anything they like to the extra space, such as glitter and small drawings. Then, take a pin back (like a safety pin with a flat back) and glue it to the back of the shamrock. Once the glue dries, pin it onto the kids shirts and they are good to go!
Shamrock Place/Napkin Holder
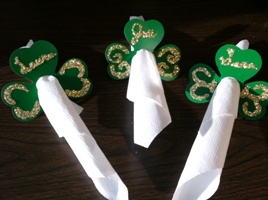
If you are having a St. Patrick's Day party and the kids want to help set up, this craft is perfect! All you need is glue, gold glitter, scissors or a utility knife, and
5 Inch Shamrocks. Before you set the kids to work, cut quarter-sized holes in the center of the shamrocks with the scissors or a utility knife. Then allow the kids to draw designs on the left and right leaves of the shamrock and the name of each person. Place the shamrocks on newspaper and sprinkle glitter all over to cover the glue. Roll the napkins up and now have custom St. Patrick's Day napkin holders for your guests!
Shamrock Picture Frame

Something a bit more time c
onsuming, but still simple to make this Shamrock Picture Frame is perfect for capturing your favorite memories during St. Patricks Day.
To begin, take a
sixteen (16) inch Green Shamrock Cutout and place it on a cutting mat. Cut out a rectangular hole approximately three and a half (3 ½) inches by five and a half (5 ½) inches on each leaf of the shamrock with a utility knife. Make sure to do this on the cutting mat/board so that you dont harm any other surface.
After you have done this, have the kids decorate the borders of the holes as well as the rest of the shamrock. Permanent markers work best, but glitter will also make a great touch.
Once the kids are done decorating the shamrock and everything has dried, turn the shamrock over. At each hole place a four (4) by six (6) photo in the hole so that it overlaps the shamrock slightly. These can be any photos of the kids or family members; take pictures during St. Patricks Day and print them out after to use.
Then, glue a solid green shamrock of the same size behind it to increase its strength or cutout a cardboard piece the same size and shape as the shamrock.
Rainbow Craft
There are many different variations on making a rainbow craft for St. Patricks Day, so you can follow these instructions or adapt them to the materials you have.
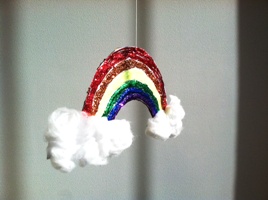
You will need a paper plate, paint or markers or pipe cleaners, glue and cotton balls.
Cut the outer edge of the paper plate away from the center and trim it down to the size best for what you want.
Color the paper plate edge with paint or markers, or glue on pipe cleaners that match the pattern of the rainbow.
Take a handful of cotton balls and glue them to the bottom of the rainbow.
Optional: punch a hole in the top of the rainbow to use it as a
hanging decoration.
Leprechaun House Trap
One of the most exciting things about St. Patricks Day is trying to capture your very own
leprechaun, but you have to be careful you dont scare it away. There are many different ways you can make a leprechaun house, so you can follow these instructions or adapt them to suit your needs. For this house/trap you will need a shoe box, construction paper, a pot o gold and a clover field.
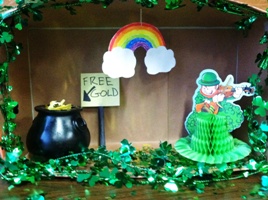
Start by covering the lid of the shoe box in green construction paper and the rest of the shoe box in either green or brown construction paper.
Place the shoe box into the lid so that it stands up on its side.
Decorate the inside of the shoe box with
Shamrock Stickers, a rainbow and of course a pot of gold. The stickers can be placed right onto the construction paper. Use the rainbow from the St. Patricks Day Rainbow section and the
Cauldron Tea Light Holder as the pot of gold. Fill the cauldron with crumbled up gold foil, pennies, or gold coins.
Decorate the lid as its the leprechauns yard: fill it with Fanci-Fetti Shamrocks so that it appears as if it is a clover field. Wrap the sides of the lid with Shamrock Garland to also give the effect it is in a clover field. Leprechauns love their gold, so post a sign reading Free Gold. You can stand it up in the yard or hang it from the top of the shoe box. To trap the leprechaun, make a sign reading Do Not Enter because leprechauns love breaking rules, and hang it at the top of the shoe box. Behind the sign have a small green berry basket rigged so that when the leprechaun goes to grab the gold the basket will fall on top of him and capture him.
Leprechaun Craft
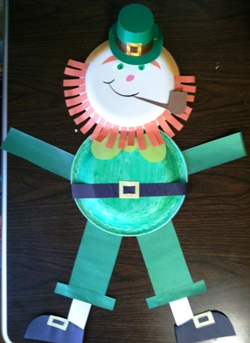 What youll need: two paper plates, construction paper, markers and/or paint, and glue. Start by coloring (with markers, crayons or paint) the one paper plate solid green; this will be the body. Color the other paper plate a pale skin color. Take a sheet of orange construction paper and cut it into rectangular pieces about two (2) inches long and half (1/2) an inch wide. Glue these pieces to the edge of the skin colored paper plate as the leprechauns beard. Cut two (2) curved orange pieces the same size, but glue these on the plate where eyebrows would go. Draw on the eyes, nose and mouth of the leprechaun. For the hat you can either cut one out or be really creative and use a
Mini Green Top Hat with Buckle Band.
To attach the mini hat, poke two holes into the plate and four holes into the mini hat. Thread string through the holes so that the hat is connected to the plate and tie it in the back. Or, you can use a hot glue gun and glue the hat to the plate.
Take a few more pieces of green construction paper and cut them into pieces for the arms, legs and a bow tie.
Attach the bow tie slightly under the paper plate head. Overlap the paper plate head and body and glue them together.
Attach the arms at the side of the paper plate body and the legs at the bottom. Cut out another black strip and yellow rectangle; glue them down as a belt and belt buckle.
Cut out two (2) thin strips of white construction paper and attach these to the green part of the legs. Then, cut out two (2) black shoe forms each with a yellow rectangular buckle shape and attach these to the bottom of the white pieces.
Optional: take any left over orange, or brown, construction paper and cut it into the shape of a pipe. Attach it to his mouth so that he is smoking a pipe.
|
|
|


